My practice is 3D graphics and animation. I first realised the potential of 3D graphics when I was 15 years oldwhen I watched Pixars Toy Story. I realised how this was the shape of things to come as it gave 100% control over the camera angles and artwork.
My previous aspirations were to become an illustrator and I enjoyed spending hours drawing and painting pictures. However, as time went on and the technology to create personal 3D artwork became widely available I spent time observing 3D packages, looking at which would be the most widely used. I looked at other people’s artwork and how they were created as well as researching which 3D packages employers were asking for experience in.
Following this research I applied for a job that specialised in outdoor canopy’s, which required a 3D creator to sell the idea to their target market. I made the first interview purely on the strength of my work. The action I took away from that interview was to learn how to use their programs and create a 3D rendition of their product. Although I never made the second interview I took what I had learnt as a personal achievement and decided that to go any further I would need a degree and with out a second thought I enrolled at collage.
I started with trying to understand the fundamentals of 3D and by undertaking a degree course I knew I would get the best start and would be able to apply myself to gain the qualifications I needed.
I pride myself on working hard and being the best I can. I am a perfectionist and do like to work alone when required however through my college course I have found I am able to work very effectively as part of a team.
I continue to monitor advances in the 3D industry and aspire to continually better myself by running through tutorials. This broadens my knowledge by learning new techniques and furthering my development. I love to show others what I can do and take great pride in seeing my finished work.
Outside of collage work my hobbies are collecting predominantly 3D movies and watching their special features. I draw, paint, and scour the internet for animation and 3D projects from people with the same interests. I also take my already completed college briefs and improve them to the best of my ability, ever perfecting my work until I’m happy with it.
After gaining my degree my aim is to find a job within 3D. I understand that getting a paid job immediately after graduating may be challenging. However I have made the decision to apply for 3D orientated work placements if I cannot secure full time paid employment within the industry straight away. Placements will give me the required experience that I need to progress in the industry and everything I learn I will ultimately put it into practice in business of my own.
Part of my blog has gone missing for some unknown reason so I'll try my best to re-write it here.
My original plans for my final major have somewhat changed! I intend to find a narrative that gives me the most visual influence and create my own character's setting and animate them which should be 2mins approx.
After going through lots of poems I decided that from Tim Burton's The Melancholy Death of Oyster Boy's
Roy the Toxic Boy was the one that gave me the most imagery.
This is just a rough sketch of how Roy the Toxic Boy came to me after reading the narrative. This my first impression of how I may want him to look.
I decided more work was needed on how I wanted to make toxic boy look so I started by just drawing squiggles and random different shapes for heads and turning those squiggles into faces. Below are some of the design sketches of Toxic Box using this technique:
I worked on a design I'd come up with and developed it a little to give me a a character I was happy with.
These are a few images playing with different head and face shapes, along with how I'd like the final character to look using a mans shirt as a lab coat:
It included experimenting with different Face colours and gas masks.
A better picture of the character design with out gas mask.
A design of a gas mask drawn in different angles.
I am thinking that this design would detract from the characters look.
I'm wanting something that's a little less realistic and more of the toon end of the spectrum.
Just a couple of action shots and one cleaned up
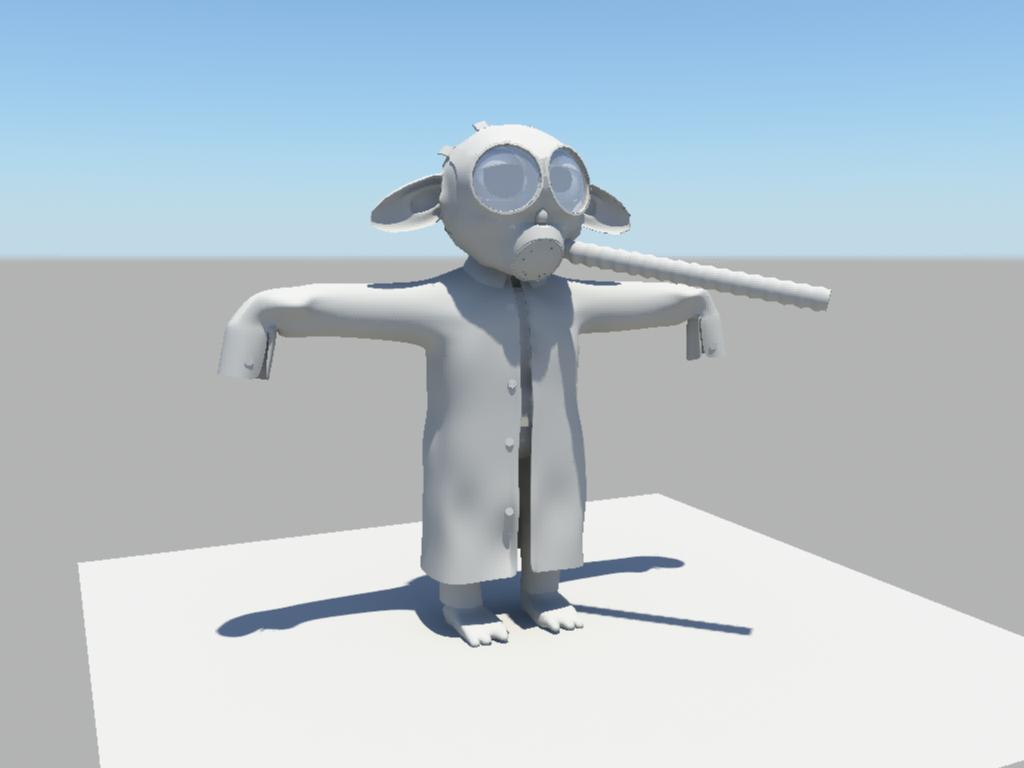
I'm getting close with the characters final look but I need to know what the characters body shape should be: This is my final characters design wearing a gas mask. The final version will vary a little as I work my way through modeling him!
this is a big dislike for me I think the eyes are what say everything about a character and need to build a better looking eye
after just looking up how a real eye is built up I came up with this pretty good representation using a cluster and a set driven key to control the dilation
Prior to this project I had very little knowledge of UV Mapping so I carried out a tutorial with a tree frog that teaches you UV Mapping Bump mapping and spec mapping
after the tutorial this is what I had to show
For the Rigging I'm going to be working with James Dunford a fellow College student Click on his picture to be linked to his blog
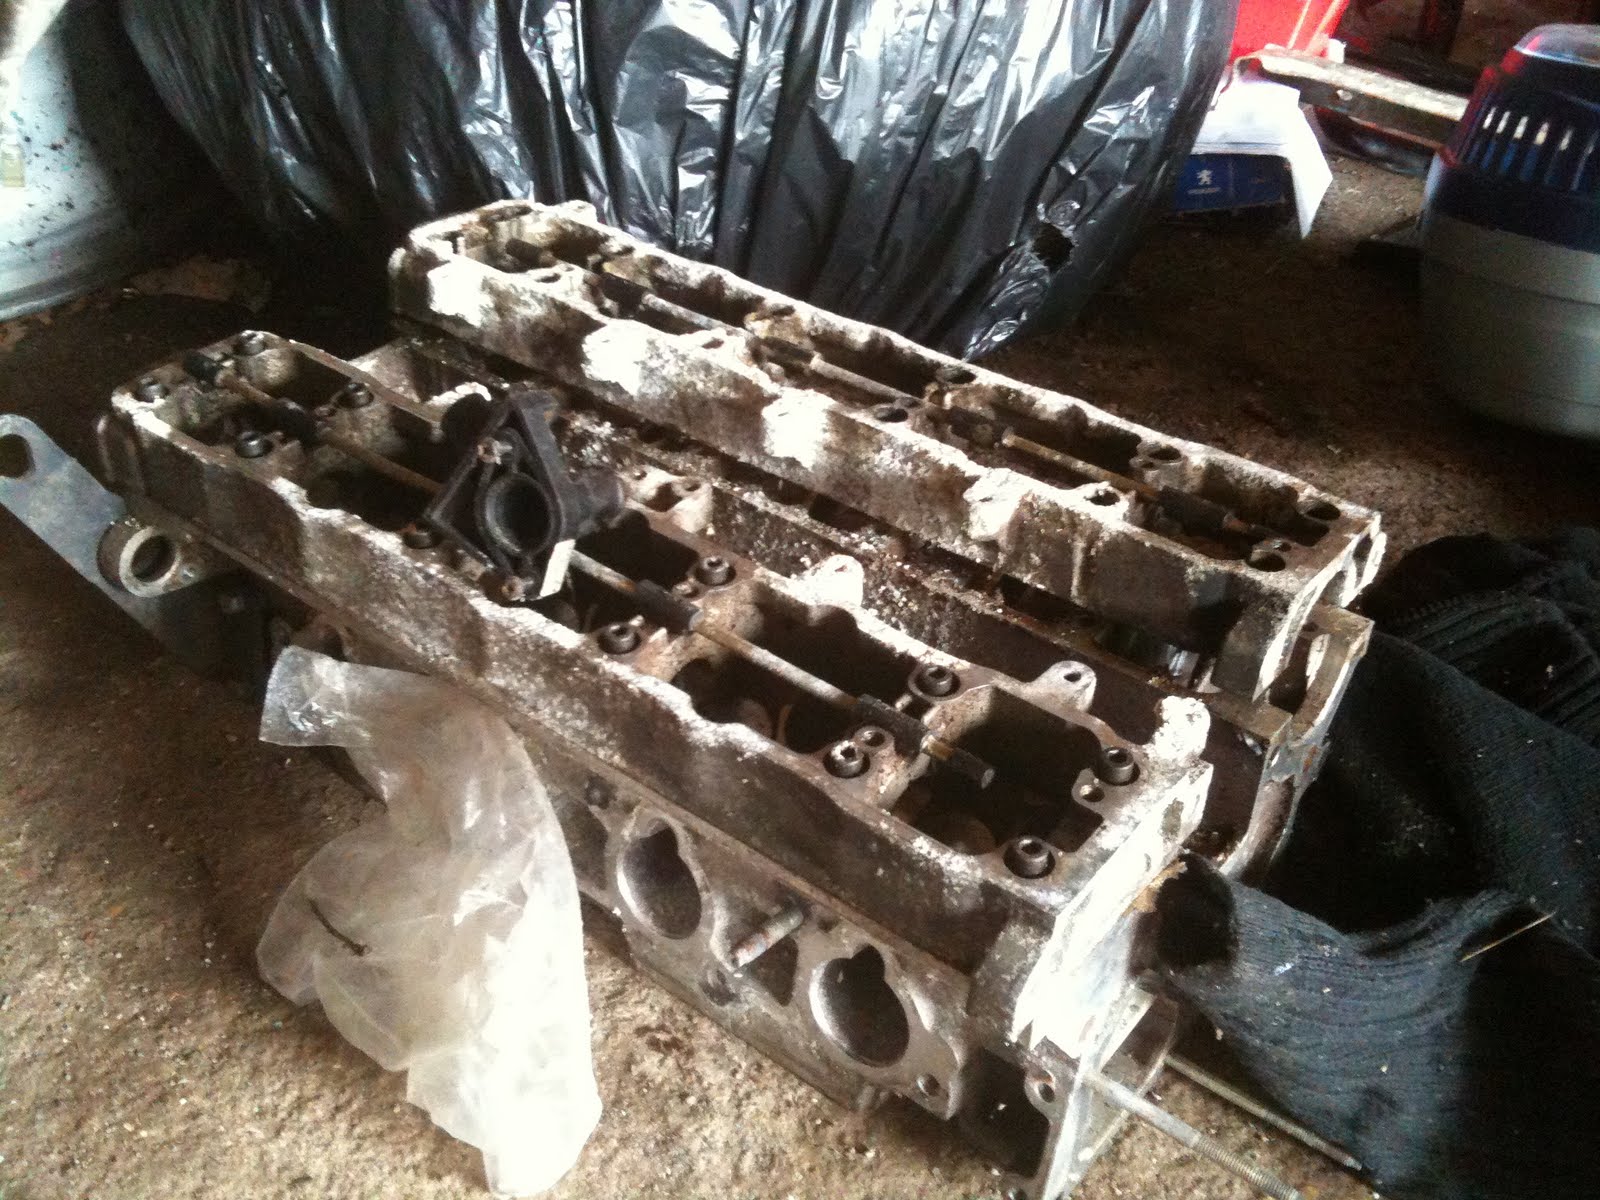
for the garage sequence it was advised that I should get plenty of images from inside garages and what could be found in them!
I set myself a limit on how long to give myself to model I built a lot of it but hat to source some models from Turbosquid to pad it out a bit
this looked more like everything was covered in snow it was just a test render to see how environmental fog would look?
after running short of time I've had to get rid of the environmental fog and a few other unneeded assests to cut down on rendering times the average image was taking up to 3 hours on an 8 core P.C. and a £1,000 graphics card needs must!
something I am concerned about is with a lot of my work being 3D based by the time the models were done it was ready for hand in so I'm quite in experienced in animation side of things,
I got hold of a great book called the Animators survival kit. It shows you key frames of lots of different poses and actions great when your trying to work out where the feet are suposed to be in a walk sequence to think about walking is something we do without even thinking when it comes to working it out for an animation you'll fine it a totally different experience!
I'm not afraid to say that I'm Dyslexic after trying to navigate through this book most of the information is illustrative so helped a lot
but there is also a 16 DVD set out on the Animators Survival Kit I was able to see a copy of those and found them equally as helpful I found they helped me more with getting into the mind set of animating and usually had them playing in the background as I worked
Now that it has come to animating it we have run into some major issues the weights painting is causing the geometry to collapse in on it's self this makes the NCloth behave very erratically and make animating very hard!
I've tried my best with the final version and since time is almost up I'll have to leave it there!
I've found someone's blog with a wide array of character designs:
Please click the link
I know I want to give my character a strange but not scary appearance. I'm about 90% sure I want him In an old gas mask, something that shelters him from the fresh air.... but something that he could have found in a skip...
these are just a random bunch of gas masks i've found that have the genral feeling of how I want Toxic Boys Mask to look
As suggested to me, I've started to look at Supinfocom's shorts:
This short is about a little girl that gets drawn into her bowl of letter soup and finds herself wandering a desolate land with the spaghetti which once floated in her soup now floating around her head. She stumbles across a boy stuck in the ground she tries to help but he's swallowed up by the ground, she looks around and notices that the whole floor is covered with the faces of small children. The eyes and mouths of these children glow and as the little girl tries to make a hasty escape she finds herself in the same situation as all the other faces in the floor, but she she manages to escape and return to her real world.
This one starts as a little girl scavenging for food. She finds a small window that catches her interest but finds the window flips and falls a long way down, only to land amongst some giant tomatoes. She discovers that the tomatoes belong to a giant singing chef that eats small miniature children to which she fits the category. There's a small chase scene and she dresses up a chili to make it look like her, the chef eats it thinking he is eating her but as it is really a chili he drinks as much wine as he can find to cool his mouth. This leaves him like a beached whale in the middle of his floor - then It's the miniature little girl that has the last laugh.
This is a good one called Hemlock. I really like his style and anticipation and it has a good narrative with excellent animation.
I've watched this over and over the style and animation work very well together this is the kind of look I'd love to be able to achieve! For more information on the video and the Making of please visit http://www.oktapodi.com and If you haven't watched It do so you wont be disappointed!
My original Idea for my Final Major has been canned not happy about it but there you go! at the moment I haven't got a clue what I'm going to do now but I know I have to come up with something ASAP!!!!....
For now the idea is to create a character of my own from scratch and show my full workings out from start which may even just be a scribble to a rigged textured and UV Mapped 3D model and a short animation.
Matt Clark advised me to look at some animations from a French company called Sudinfocom, very dark is the only way to describe them but here are links to the videos I found on Youtube
Please Click the Youtube Logo to see some of there videos:
We've pretty much been given a brief that's basically do what ever you want within your subject area of choice as long as you can justify why we have decided to do what we have.
For my self motivated brief I decided that I would treat it as a means prepare myself more with the skills I will need come June. This is will be the time I graduate and begin looking for a job and as no one is going to just hand me a job at the end of my course I wanted to give myself the best chance and be prepared as I can be.
I've looked into some jobs, just googling them, to find out what is the prefect candidate and the skills required: Here are a couple of examples:
...will require an excellent knowledge of 3d modeling softwaresuch as 3d studio & maya. you will be expected to also ...game for a true market leader. apply immediately to avoid disappointment. 3d artist / animator - london- 3d studio, maya, flex, flash ...
3d artist/animator/motion designer location: london salary: £££££ company: mcgregor boyall job type: permanent ...candidate will have substantial experience with: maya after effects photoshop illustrator flash the ideal candidate would have dealt with 3d ...
sketches as well as a computer. Any 3D illustration experience, working with Cinema 4D or Maya would... of design and also the technical aspects involved with this. You must also have an online portfolio of your Contract: Contract
will provide the majority of the in-house 3Ddesign and animation. Applicants must be good communicators, work... Salary: 22-28k depending on experience Plug-In Media is looking for 3D artist to join the team... creative Maya generalist, who is extremely motivated and has good Photoshop skills. We are predominantly... product output. The perfect candidate would be skilled in all aspects of the Maya workflow; if you can
I looked at my final project subjectively and found there to be skills that are required for it I don't have. I've done lots of theory and very little practice so I've obtained as many tutorials as possible! I have prioritized the ones that I'll require the skills from for my final major project as 1 element to this open brief.
As I already mentioned before I'll be treating this as a mean to go on and would like to try get involved in as many projects and portfolio building projects as possible. One of these projects was for a Poppy Appeal competition.
The brief was finding a way to promote the poppy campaign, aiming at the market of a 15 to 25 year olds. After giving some thought to this and just thinking a little way back as to what would catch my attention and decided on a novel aspect and that I'd remain with using a poppy (it's hardly a poppy appeal if it's not a poppy on sale.)
I decided on using the idea of a wind wheel like the ones often found at the sea side or fairs.
I wanted to take the existing design of poppy making use of it's low cost of mass production. So I kept the stem of the poppy and re-designed the petals so that the flower would spin in the wind or when blown on. The petals could be designed to say anything or be in any design from camouflage poppies, simple poppies in red or ones like the one show carrying the motif 'We Will Remember Them.'
To support this I'd create a campaign to promote and advertise my design of poppy. This would be a simple 10 second advert using some compensate and 3D images. There would be a World War 1 soldier walking up a mound/small grass hill with some WW2 fighter planes passing over all done in very dark silhouette with a sunset sky. The poppies would be spinning in the wind as the planes few by. The closest I've got so far is of an animatic.
The planes would be created in 3D. I was thinking of WW1 Planes but a WW2 Soldier images of the plane I built:
Before I'd actually made a prototype poppy I thought I could just build one of them in Maya and animate one if one couldn't be built in time!
But I did manage to make one and a working one at that! The video I shot of it working prior to submission doesn't seem to want to be converted to a format that can be uploaded online! The best I can do is a screen capture of it working:
I've dropped the idea of the poppy campaign to pursue a project that has been brought before me.
Another student, on a Graphic Design course at my college has approached my Tutor to ask if I could take characters that he has designed and build them into 3D. This could be good for my portfolio and help me to gain some experience in rigging for my Final Major Project.
It's been just over a week and there has been no reply to the original email address I was given to contact the student wanting the 3D Characters built. I'm going to go into college over the next few days and see if I can't track him down.
With no sign of been able to track him down I've left a message with his Tutor and my contact number with Lynsey our mutual Secretary.
While I'm waiting I've spent my time downloading tutorials and doing bits of work on my Final Major. I've placed a post on a character creating forum asking if there was anyone that had created a character in 2D that I could build in 3D. Link below but please note you have to be logged in to view post!:
I've not heard anything back either about doing the work for the student in question or the post I put up looking for a character to build.
I received a phone call from the student apologizing for the lack of communication on his part as stating he would like to get this project underway!...
Unfortunately no return contact information was left and so far this has taken up the best part of 3 weeks! 3 weeks that could have been spent doing other things! All I had spent time doing this last 3 weeks was downloading and looking at tutorials on line, not wanting to undertake and large tutorials due to awaiting the 3D Character Project.
I've given the character project a wide birth and I'm concentrating on Plan A which was to prioritize the tutorials I had found and completing them and applying them to mini projects of my own.
I've spent a good few weeks looking through tutorials mainly towards the character setup rigging side of things, since these are not where my strengths lay I should at least attempt to understand them. Maybe because I haven't had much to do with the rigging side of things is why my strength seems to be focused on the modeling side of things??
The links are to Digital web pages on what the tutorials entail.
I've started to look at the introduction to rigging since it advises to get a basic understanding of how a rig works! After completing all the sessions in this tutorial I feel I have picked up enough to be able to progress further. Learning about creating clusters that act as controls with in a cv curve that can be parented to bones for all sorts of useful things!
I watched a few of the videos on character rigging but it's pretty much the basics of the character set up tutorial that has been released later. It is on an older version of maya than I currently run and I'd probably spend more time trying to find where they have moved the buttons to in the newer version of maya than on that tutorial itself. As time is pressing on I've opted to jump into the character setup tutorial, here goes!
I'm only half way through the tutorial it's taken me just over a week and I've had to rebuild the thing about 3 times!!!! You have to watch the tutorial very very carefully and sometimes things just don't seem to click into place 1st, 2nd or even sometimes 3rd time!! I really need to know this though for my 3rd year final major!
On the up side of it all though it doesn't take half as long to rebuild when you have a better idea of what it is your actually doing! It's like building a Chinese puzzle when you don't even know what it is your looking at!
It's taken just over 2 weeks to do but Im fairly happy with the rigg! I know there are quite a few mistakes here and there but I don't have much time to go back and rebuild them so I'll have to go through the tutorial again at some point to try and get a perfect setup!
I've spoken to one of my tutors Matt (our Maya Specialist) and he seems to think there is a better rigg set up that he uses for his character set up's that's much more stable...I'll have to find out which one that one is and give it a try!
Something I'm going to have to learn is how I'm going to rigg up a working piston. The T-800 Endo Skeleton from the Termination is covered in them so this is a must! Here's a good tutorial of how to build such a piston! It's a little fuzzy but watch it a few times and you should get the hang of it!
So with this on board I did a small tester of my own. Using the partially built T-800 i've just done a small animation of the neck pistons and the arm pistons.
After talking to Mike our Course leader he said he doesn't mind me doing all these tutorials as long as I put the tutorials into practice and apply them to a project of my own. This means I'm not just submitting something that I copied from someone else which is something I'll have to bear in mind as the Terminator project is for final major and I don't want to use him in this brief!
Another tutorial I want to learn is Maya Muscle as I intend to build an Arnie skin to cover my T-800. I'd love it if the Arnie Geometry could flex it's muscles! This tutorial is somewhat frustrating the basic concept of building and rigging muscles to work is pretty straight forward however my Maya is not! I keep following the tutorial step by step and lots of different things are going wrong ... maya is behaving in a way it shouldn't! I have got around this by installing 2 older versions of maya and installing a windows operating system on my Mac and intalling a version of maya to run on there too!
I've learned alot about skin sliding, jiggling skin, relaxing muscle, flexing and muscle shape changing but i'm running desperately low in time and I need to find a way of taking what I have learned and applying it!
Finding a character to rig up!
I was thinking of something I can copy a cartoon character maybe then the characteristics have already been established?
I have always been a fan of Lilo and Stitch and he is such a great little mischievous character! He kind of reminds me of my friends dog! Here's what I have so far!
Sadly I've decided that I'm not going to continue with this model! I think it would take a long time to paint the weights for stitch to work properly with this rig and I need something more original and something quick to model!
For the piston I've modeled A JCB Arm (Digger to some of you out there):
... well that will take care of the piston but I need to find things for the other tutorials.
For the character rigg I'm going to model a wooden artists pose-able manikin and animate that!
I've come across an issue with the manikin and this rig... The joints revolve around a large ball joint on the model whereas the rigg wants to bend and flex the joints. I did try and fix this with painting skin weights but I just can't get it to look right. The picture below shows the furthest I have got with the manikin as Maya crashed and took away the hard work in trying to get the manikin to bond with the rig! and I didn't save it! LESON LEARNT!
I've tried to get around this by removing the offending limbs and trying for a ghost rider inspired look!
I'm just not happy that you'll get to see the full range of animation so i'm abandoning this idea aswell.
While doing my tutorials i'd stick on some DVD's/Blurays special features and played the making of and behind the sceenes paticually at Appleseed Ex-Machina:
Although I can't find copies of the footage on the blue-ray it shows some of the ways the realistic movement was performed. Much of it was actors in motion-capture suits actually acting out the scenes in real time then using a facial recognition software to animate the realistic facial expressions which might other wise missed by animators.
Other things I watched were the making of the Terminator Salvation on how the brought back a young Arnie for the 4th installment:
They managed to recreate the head in CG. The chest area was taken from the Stan Winston studios from when the 1st Terminator was made, it required a caste to be used and they used a body double that strongly resembled Arnie's physique and then simply merged all the elements together.
I have less than a week to go so I better had come up with something quick!
I think more has to be done with just a JCB arm and maybe interlink this with my character!
I'm going to do a JCB driver and build the rest of a JCB then animate them together as one project! Finding blueprints for a JCB is proving quite difficult! I'm going to have to go on just creating one from reference material! It doesn't need to be highly detailed anyway!
There are some images below for possible models!
This one comes with it's Blue Prints too!
But these are too small for me to use in Maya really and I'm not sure about the tracks as i've never animated anything like that before and wouldn't have a clue where to start especially with it been towards the end of the project!
I've found a winner! Someone one had already modeled in 3D but I like the look of it! Also I've found a helpful tutorial with the tracks!
This is only a days worth of modeling but it's getting there!
and after some textures added and the default light setup in the render setting were dicovered!
It looks quite impressive, but unfortunately it takes about 2mins to render out and there's about 1500 frames ( 48 hours at best ) to render so I'll have to pass for now! And settle for:
Not the greatest setting in the world but this project was never about the animation or the rendering side of things and I'm just using this to demonstrate what I've learned from the tutorials I have done. All that's left to do now is render out the small animation I've put together!
I'm 29 and decided I needed to make a career change in my life. I knew I'd always wanted to pursue my artistic side but so that I can progress further I have returned to education.
If anyone should want to email me direct it's:
gnrlee01@gmail.com


